Best Practices
This document provides a few pointers on how to get the most out of the Reactional Music system. It is not a complete guide but rather a collection of tips and tricks that we have found useful in our own work.
For a crash course in setting up your session, we recommend watching this 10 minute video that goes through all the different aspects needed: Tutorial 1: Composing for Procedural systems
General
DAW Support


Reactional Composer supports importing from a variety of DAWs. Currently Reaper is still preferred, but these others should work as well.
Cubase, Bitwig and Studio one are supported via the DAWProject file format. Ableton is also supported, but note that none of Ableton's built in instruments are supported.
Please export / save your project in this format in order to load it into Composer.
VST3
Our rendering system currently requires the use of VST3 plugins. In the future, we plan to support AudioUnits and Clap as well. Most VST3 plugins are compatible, provided they do not include built-in sequencers, arpeggiators, or similar features. Our system only parses the actual MIDI data notated on the Reaper timeline.
No Multi patches
While it is common to have a single instance of a plugin, for instance Kontakt, and have many instruments loaded into that on different midi channels, the Composer project file reader does not support this use case. As such you need 1 VST instance per instrument.
MIDI
Composer processes the MIDI data in your project but currently supports only basic MIDI features, such as notes and velocity. Advanced MIDI features like keyswitching are not supported.
To ensure a flawless rendering process, keep your MIDI data well-organized:
- Avoid misplaced or overhanging MIDI items.
- Regularly glue MIDI items within the selected time range of a part to maintain order and accuracy.
Effects
Composer supports VST3 effect plugins that are placed in the plugin chain of a Vst3 instrument. These effects will be printed to the resulting audio files being rendered. As a side effect this means that things like distortion will not be applied as a bus effect, and playback in composer might sound different than in the DAW.
Avoid using time-based effects such as echoes and delays, as these will not be rendered correctly. Since Reactional is a generative system, the timing of the music is not fixed, and the tempo can change at any time.
Performance Considerations
Less is More
... at least when it comes to the number of instruments running inside the game. You need to be conservative with the number of instruments you want to have in your composition and ensure you compose with these restrictions in mind. Try to limit yourself to around 10 instruments.
Picking the Right Instruments
While constantly evolving synth beds are the bee's knees in terms of texture and timbre, those rarely do well with the Reactional system. Since we try to render as little as possible from each instrument, what sounds very alive in the DAW might appear a bit stale.
Short sounds, like staccato, pizzicato, and plucks, lend themselves extremely well, while longer legato-type instruments might be harder to get nice.
Very long sounds, like pads, will work nicely; however, they will also increase the file size. More notes are preferred over longer ones.
Routing is Your Friend
While we advise keeping the number of instruments down, this only refers to the actual VST3s used. You can add as many Performers: and Stingers: as you like, as they can be routed to other Performers that do contain a VST. For instance, you might have a drum synth on Performer: Kick and then send Perfomer: Snare, etc., to the kick channel. This way, you have individual access to affect every part individually with Macros in Composer.
General Optimization Tips
To reduce memory usage and improve game performance, the following strategies are recommended:
-
Minimizing Release Times: By trimming long release times, you can significantly decrease memory usage.
-
Use the Reactional Reverb: By using the Reactional reverb instead of rendering your sounds with hardcoded reverb built in you can use much shorter audio files.
-
Managing Instrument Ranges: Keep MIDI ranges as tight as possible. Instruments with a large range between its highest and lowest pitch can cause unnecessary resource demands. Keeping MIDI note ranges without any "gaps" can help reduce this overhead.
-
Proper Instrument Labeling: Ensure that percussive instruments are labeled correctly using the appropriate syntax (e.g., "Perc" for percussion). This prevents them from being sampled as full melodic instruments, which can consume unnecessary resources. Proper classification can make a significant difference in performance.
Project Setup
Composer automatically reads the metadata from your project, so you do not need to export any stems or loops. However, there are a few things to keep in mind when working with regions and markers.
Summary

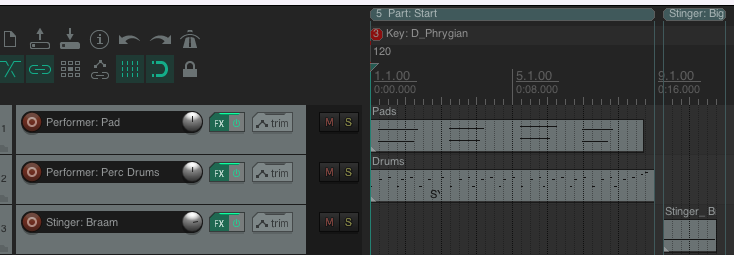
- Use regions to define sections of your music using the prefix
Part: <name>. - Use markers to define chords, scale, and key changes.
- Instruments named
Performer: <name>will be rendered as a performer. - Instruments named
Stinger: <name>will be rendered as a stinger. - Use sends to route MIDI if you want to use multiple performers for a single VSTi.
- A
Stinger:region will render anyStinger:instruments together.